
Haunted Ember
- Unity
Haunted Ember is a 2D mobile platformer where players use light-based mechanics to explore a haunted castle, avoid ghosts, and solve puzzles to reach the end of each level.
Level 4: Garret
Level 4 challenges players with deeper mechanics, such as luring ghosts to create safe paths. Players must learn that moving platforms can both push crates and act as obstacles. Light switches are used strategically to activate different gameplay elements and reach the exit.
In Level 1-5, players learn the 'Hanging Ghost' mechanic—discovered during an action block test. It involves luring a ghost to one edge of a safe light zone, so it's eliminated by light from the opposite side, clearing a safe path forward.
Level 4 Part 1
I changed the ghost’s patrol from a three-point to improve clarity, making its behavior easier to understand.

This back-and-forth movement serves as a hint. Players must bait to lure the ghost.
Level 4 Part 3
Level 4 Part 2
Level 4 Part 2 is designed with two distinct paths:
1. Using ghost tiles
2. Using moving platforms

Part 3 was designed as a buffer to ease the pacing and offer a more comfortable experience. While the spike pit below appears threatening, the actual solution is simple:
Players who patiently follow the intended path will find it smooth and satisfying.
Level 5: Reach Spire
Level 5 is a challenging level. The player needs to use all the skills learned in the previous levels, including frequently choosing whether to turn on or off the lights, utilizing the collision properties of Ghost Tiles, using the Moving Platforms to raise objects, The Moving platforms to push crates, avoiding being hurt by the Spikes, and using Safe Zone lights to avoid being attacked by patrolling ghosts. The player needs to know in what order to place the crates on different Pressure Buttons to trigger the correct Gate in order to pass the level.
Level 5 Part 1

Part 1 focuses on decryption.
The width of 5 can only accommodate the position of one player but cannot accommodate the box and the person at the same time.
The path from 4 to 6 can only accommodate the box falling down, but cannot allow the player and the box to stand on the platform 6 at the same time.
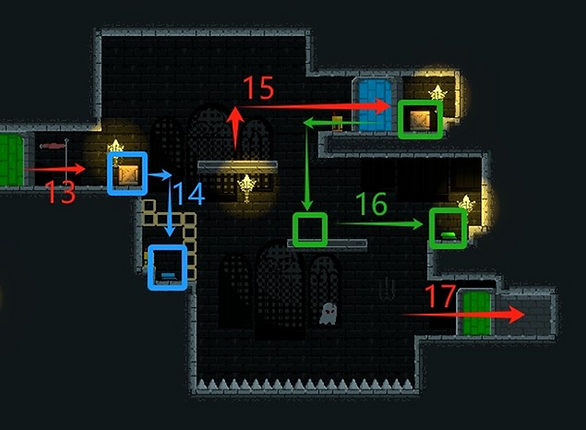
Level 5 Part 2

Part 2 is the position of map label 13.
Using one box to trigger two pressure buttons will free up another box to be placed on the third pressure button to trigger the final door, ultimately achieving a scene where two boxes trigger three buttons.